You do not need AI, an account or an integration to use Visual Nerve. You can create, edit, analyze and present diagrams through the interface. The optional API and MCP connection add another way to work with the same diagrams.
The app interface is available in English, Danish, Norwegian Bokmål, Swedish, Finnish, German, Spanish and French. Choose App language on the locked screen or in Settings. This guide uses English control names. Your diagram text and narrator voice stay unchanged. Language settings .
Open your local workspace
- Open the encrypted workspace in the browser and profile you intend to use for your work. On first use, complete the password and recovery steps below before accepting storage.
- Read the first-visit storage notice. Select the acknowledgement checkbox, then Accept and continue.
- Choose New diagram. On a phone, open Projects first.
- Pick a template, enter a New diagram name, then choose Create diagram. Find a template searches by name or family; Template collection narrows the grouped choices. UML offers fourteen families and BPMN offers four views, each with its own example preview.
- Wait for Saved. This confirms that the local database transaction has committed.
The public website is at www.visualnerve.com; the encrypted editor is at app.visualnerve.com. The former website /app address redirects to this separate app root. It is not a second workspace entry. A different hostname has separate browser storage; the redirect never moves your data.
Workspace addresses: app.visualnerve.com is the encrypted workspace. The old public /app editor has been retired without deleting its origin-bound records. Restore an existing backup or encrypted transfer file explicitly. If older work was never exported, preserve that browser profile and contact hello@visualnerve.com before clearing site data. The new address cannot discover or automatically encrypt data saved on the old origin. Complete transfer steps
.
Acceptance is required because the editor needs local browser storage. Reading Help, Privacy, License or the API reference does not require opening or creating a workspace. What gets stored .
First use of the isolated encrypted workspace
On the isolated address, the first visit starts with Protect your local workspace:
- Choose a unique passphrase of at least 12 characters and enter it twice.
- Leave Automatic session lock enabled for timed locking, or uncheck it to use manual locking. Then choose Create encrypted workspace.
- Save the displayed recovery key in a trusted password manager or another protected location. Keep it private and separate from your backup files.
- Confirm I have saved my recovery key in a protected location, then choose Continue.
- Accept local storage and create a diagram. To bring your complete existing workspace from the old address, open Settings → Data & Privacy → Transfer existing workspace and follow the transfer guide .
The password and recovery key are used in the browser. There is no server password reset; losing both means the saved encrypted records cannot be recovered. The API, MCP and an AI agent cannot unlock the workspace for you. Password, recovery and session steps .
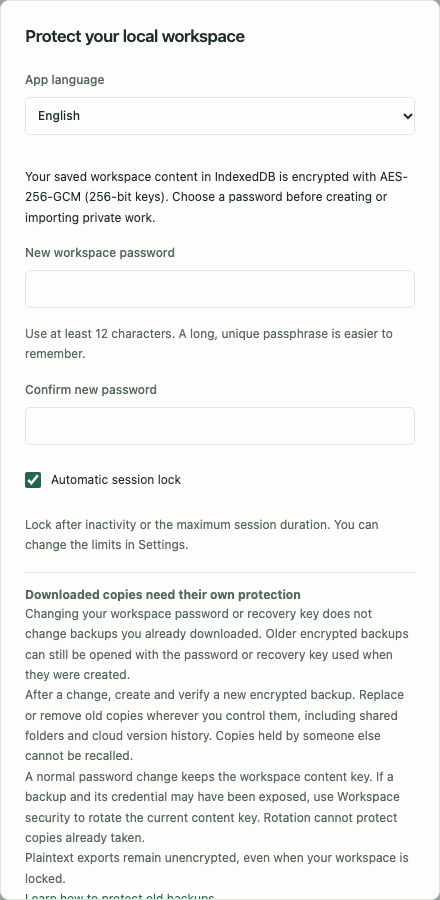
With Automatic session lock enabled, the default session locks after 15 minutes without your interaction or after 8 hours from unlock, whichever comes first. Agent requests and background work do not extend it. Turning it off keeps an open tab unlocked until you lock it; reloading or closing the app still requires your password. You can change this choice and the time limits in Settings . Save pending edits before leaving, and grant an agent fresh access through Settings after every unlock if you want to reconnect it.
When An update is ready appears, choose Later to continue or Update now after finishing open dialogs, imports and exports. Let active simulations finish or choose Stop to save their partial results; paused runs also need to be stopped before restarting. The app finishes pending saves and reloads this tab; unlock again with the same password. Saved work stays in this browser, without a backup reimport or cache reset. How app updates work .
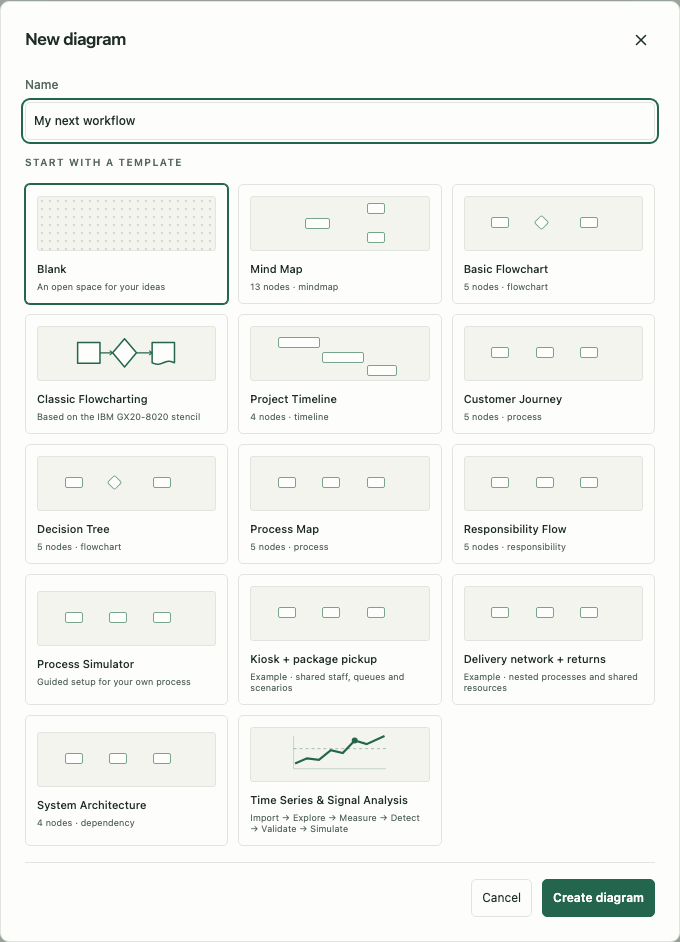
Choose a template for the question
| Template | Useful when you want to… | Example |
|---|---|---|
| Blank | Arrange your own objects without a starting structure | Sketch an unfamiliar system |
| Mind Map | Expand a central idea into connected topics | Explore a product launch |
| Basic Flowchart | Explain steps and decisions | Describe an approval workflow |
| Classic Flowcharting | Use classic flowchart symbols based on the IBM GX20-8020 stencil | Draw a workflow with predefined routines and magnetic storage |
| HIPO | Link a function hierarchy to input/process/output documentation | Document how order functions use and produce information |
| Classic DFD — Yourdon / DeMarco or Gane / Sarson | Trace information between transformations, stores and external entities | Map order data without implying an execution sequence |
| UML examples | Model software with one of fourteen structural or behavioral diagram families | Describe classes, deployment, interactions or state changes |
| BPMN examples | Describe a process, collaboration, conversation or choreography | Distinguish participant messages from work within a participant |
| Project Timeline | Show work against dates | Plan a delivery in phases |
| Customer Journey | Show the stages someone experiences | Explain onboarding |
| Decision Tree | Compare branches from successive choices | Classify support cases |
| Process Map | Describe how work passes between stages | Map order fulfilment |
| Responsibility Flow | Make responsibility part of the workflow | Show a team handover |
| Process Simulator | Build your own simulated process with guided setup | Test order-processing capacity |
| Kiosk + package pickup | Explore shared resources in a runnable example | Test whether package demand disrupts store customers |
| Delivery network + returns | Open nested processes and locate a shared-resource constraint | Compare warehouse, transport, installation and return capacity |
| System Architecture | Show components and dependencies | Explain an application stack |
Ordinary diagram modes share native objects and relationships. You can change their presentation later without rebuilding the graph. Process Simulator is a separate document with its own simulation model; a normal flowchart does not start simulating merely because it contains arrows.
For the historical stencil’s shape names, completed composites and 2D/3D editing steps, see IBM flowchart symbols .
For HIPO, both classic DFD dialects, UML and BPMN, see Choose a notation collection . Each example contains editable specialist symbols and relationships. You can also add that vocabulary to a blank or ordinary diagram through Notation collections.
For existing material, use an importer instead of manually copying everything: CSV , SQL , source code , draw.io or Visio , or native JSON and Markdown .
Try a five-minute workflow
Create a Basic Flowchart called “Approve a purchase”.
- Select the first object. In Node properties, change Title to “Request received”. On a phone, select the object, then tap Edit.
- Write a Description that explains what happens, for example “Check that the request has an owner and a budget.”
- Rename a decision to “Budget approved?” and give its outgoing connections clear labels such as “Yes” and “No”.
- Add one more object with Add node. Connect it to the right step with Connect nodes or the visible connection handles.
- Set an object’s Status to Done. Notice the explicit status indicator on its card.
- Choose Fit diagram to see the whole graph. Try 3D, then return to 2D; the underlying diagram is the same.
- Choose Export and save JSON for a restorable copy or PDF to share a visual overview.
If your process has uncertain times, staffing or demand, build it in Process Simulator and test those assumptions there. The ordinary flowchart communicates the logic; the simulator calculates what work does over time.
Find your way around
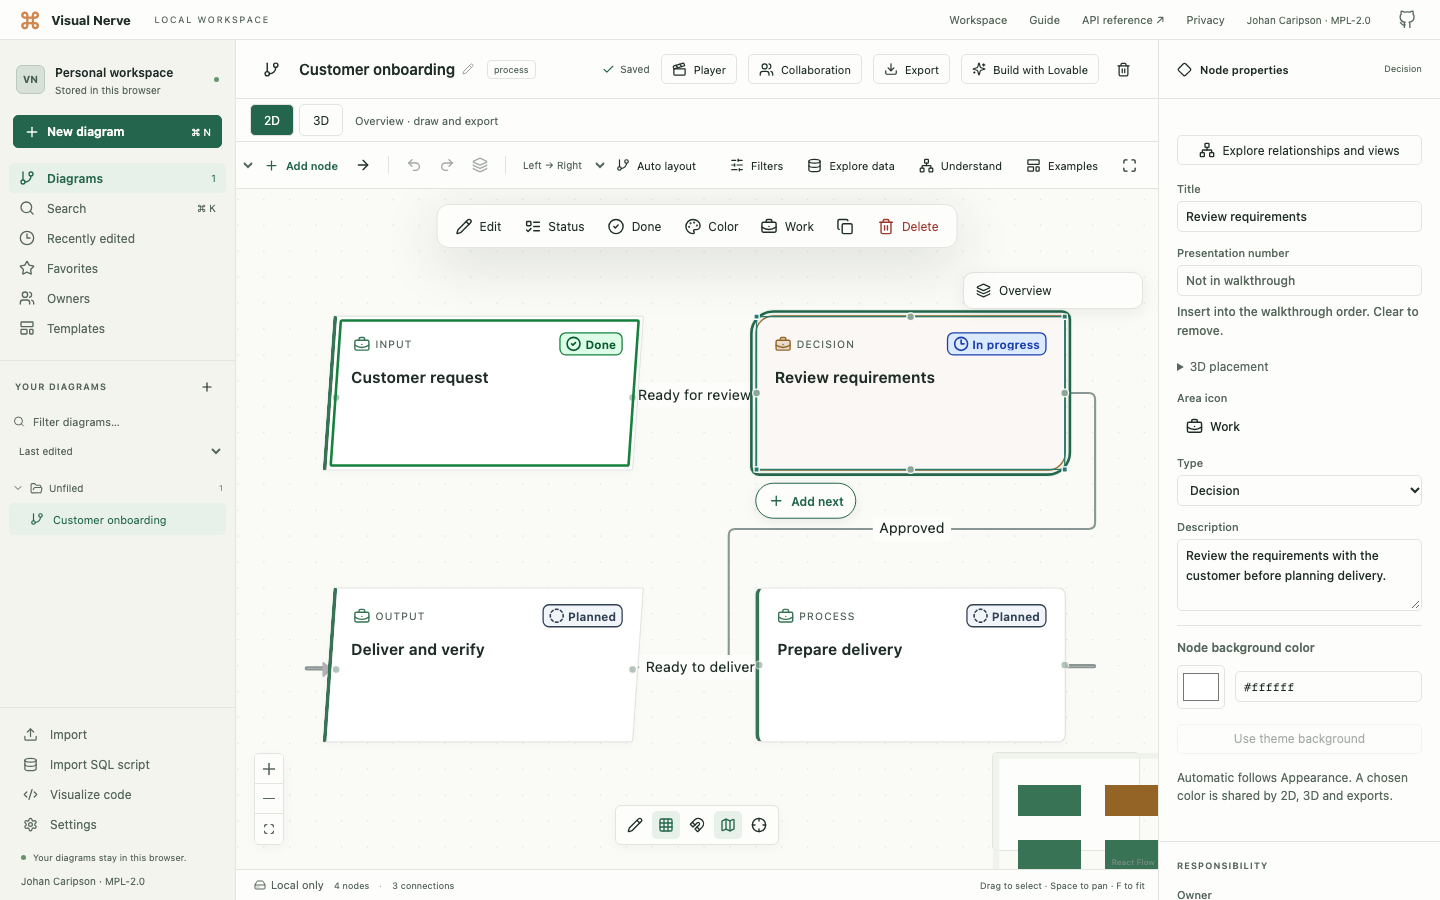
| Area | What it controls |
|---|---|
| Projects | Open diagrams; narrow by name, folder, tag, recent changes or favourite |
| Document bar | Current diagram, save status, player and export |
| Editing tools | Add/connect objects, layout, undo, filters and analysis |
| Canvas | Move, select, connect, zoom and draw |
| Properties | Object or connection details; diagram settings when nothing is selected |
| Bottom controls | Fit/focus, minimap, grid/snapping and the pen layer |
| Settings / Local only badge | Appearance, imports, storage, backup, voices and integration access |
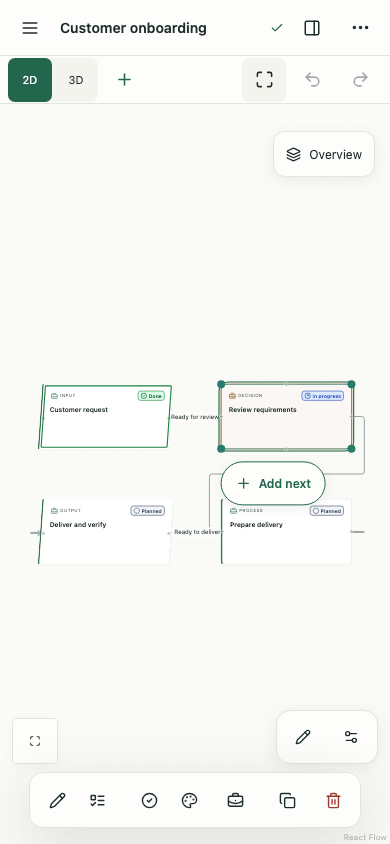
On a phone or short landscape screen
Use Projects to choose a diagram, then return to the canvas. Drag empty space with one finger to pan and pinch with two fingers to zoom. Tap an object and choose Edit to inspect it. Open Diagram actions for export, analysis, player and Settings. Panels scroll internally; close them with their close button or the dimmed background. See canvas controls .
Save, reopen and back up
There is no manual Save button. Editing saves locally; Saving… means a write is pending, Saved means it committed, and Error or Conflict needs attention. Give the browser time to show Saved before closing it.
Return using the same browser profile and website address. Another device, private window, browser profile or origin has its own workspace. Nothing automatically transfers between them. In Settings, Export all data creates a complete workspace backup; Restore backup imports one through a reviewed Merge or Replace flow. Ordinary backups from the existing workspace are readable JSON; backups from the isolated workspace are encrypted and need the password or recovery key valid when exported. Backup and restore steps .
For a complete existing encrypted transfer file, use Transfer existing workspace on the isolated app. Local development or another still-accessible source workspace can create that file through Export encrypted transfer. This separate flow preserves original identifiers, source data, history and simulation archives, verifies the saved encrypted destination, and leaves the source unchanged. Its transfer file has its own password and recovery key. Keep the original until you have checked the destination and made a new backup there; the two copies do not synchronize. Transfer steps .
Lock now on the isolated address tries to finish pending saves first. If saving fails, Lock and discard unsaved changes lets you choose to lose those drafts. Automatic session expiry preserves only the last durable saved version. A later password change cannot change a backup already downloaded; protect older copies separately.