Use 3D when a different angle helps you follow a crowded diagram or explain a part of it. Your objects remain diagram cards with their text, colors, icons, owners, status and connections. Both sides show readable text. You can return to the saved 2D overview at any time.
IBM flowchart symbols keep their outlines and internal lines in 3D. Add them with IBM symbols in a blank diagram or any ordinary template, including Mind Map and Timeline; the Classic Flowcharting template is an optional starting set. Select a shape and use IBM flowchart symbol in Properties to change the same saved object in either view, or choose Default node appearance to clear it. Process Simulator and Time Series & Signal Analysis retain their own tools.
Lift an existing diagram into relief
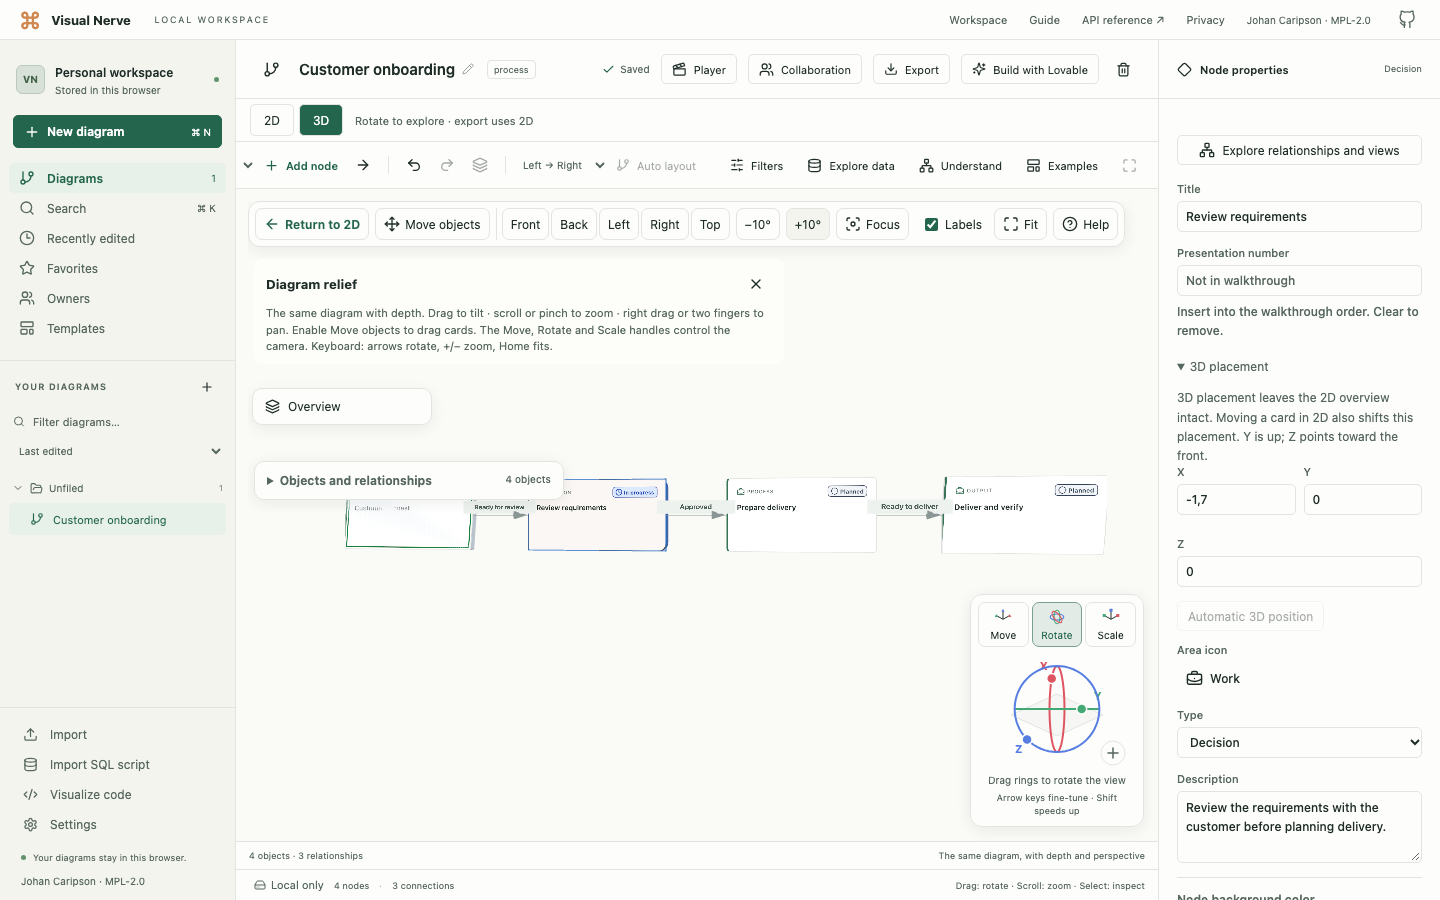
- Open a diagram and arrange it in 2D.
- Choose 3D above the canvas. The compact toolbar on phones and short landscape screens also has 2D / 3D buttons.
- Choose +10° to make a small turn. You should recognize the same cards, with thickness visible at their edges.
- Select a card to inspect its description, status and other shared properties.
- Choose 2D or Return to 2D to recover your overview.
Objects with automatic placement start on the same plane, using their displayed 2D positions and sizes. Hierarchy and connections do not automatically scatter them into depth. Previously saved explicit 3D positions take precedence.
For a ready-made starting point, choose Examples → New 3D truck lifecycle example. On a phone, find the example in Diagram actions. It creates ordinary topics, descriptions and connections covering a truck’s lifecycle. You can edit it and view it in either mode.
Rotate, pan and zoom the camera
Drag the empty 3D canvas to rotate. Scroll or pinch to zoom. To pan, hold Space and drag with the left mouse button. You can start over a card or an empty area, including while Move objects is enabled: this moves the camera without moving the objects. Release Space to return to the current tool. Right-button dragging and the two-finger touch gesture also pan the view.
Space keeps its normal behavior while typing a title or using a focused button or other control.
| Control | What changes |
|---|---|
| −10° / +10° | A small, predictable tilt. |
| Front, Back, Left, Right, Top | A named viewing direction. Back still shows readable, unmirrored card text. |
| Fit | Frames the visible diagram. |
| Focus selected | Centers the selected object. |
| Move gizmo | Pans the camera along an axis. |
| Rotate gizmo | Turns the camera around an axis; Z rotates the viewing frame. |
| Scale gizmo | Changes the camera’s zoom. |
The gizmo uses red X, green Y and blue Z handles. Drag an axis handle for a constrained change, or its free handle for an unconstrained gesture. A focused handle also accepts arrow keys; Shift makes a larger step. On a focused 3D canvas, arrows rotate, + / − zoom and Home fits.
Move, Rotate and Scale change your view. They do not resize or reposition the diagram objects. Camera changes save locally after the interaction, and reopening the diagram restores them.
On a phone, 3D tools opens the longer controls. Show/Hide 3D handles controls the gizmo. On short screens, scroll the control stack to reach the overview and object list.
Move objects without losing the 2D layout
Use the separate Move objects toggle when you want to change cards’ 3D placement.
- Turn on Move objects.
- Select a card. Shift-click adds objects to the selection.
- Drag the selected card. The selection moves in the world X/Y plane while each object keeps its existing depth.
- Release to save the movement as one undoable edit. Press Escape during the gesture to cancel the whole move.
- To set depth, select the object and edit 3D placement in Properties.
Moving a group moves its nested descendants once, even when a child is also selected. Connections follow their endpoints. An explicit 3D move leaves your native 2D positions unchanged, so the 2D overview and printable exports remain useful.
If you later move an object in 2D, its explicit 3D X/Y follows that movement while preserving its Z and existing placement offset. Automatic position returns an object to the position derived from its 2D layout.
For example, put a truck’s maintenance topics behind its operations topics using 3D placement. Rotate to inspect the maintenance side, then return to 2D to see the whole lifecycle. Status, descriptions and connections remain shared between both views.
Read and edit shared objects
Click an object or relationship to select it. Properties edits affect the same saved object in both 2D and 3D. You can change its title, description, notes, links, owners and status; completed objects remain visibly marked.
Double-click or double-tap an object’s face to rename it in place, or select it and press F2. Enter or moving focus saves the title; Escape cancels the draft. The same title appears when you return to 2D, and Undo reverses a saved rename. Use Node background color in Properties to change its fill independently of its Color accent; Use theme background restores the current appearance’s fill.
Objects and relationships is a searchable, paged list. Use it to find a card that is difficult to pick on screen, inspect a connection, or navigate with the keyboard. Select objects and use Connect nodes, or the corresponding Properties action, to create a connection; then edit its direction, label and style.
Code cards and table summaries use their saved native size. To show more code detail on a 3D face, enlarge the card in 2D first. Interactive scrolling inside a code card is available in 2D; the 3D face shows its top content.
The pen layer belongs to the 2D overview. Return to 2D to draw annotations; they remain saved and can appear in PNG/PDF/SVG exports.
HIPO, classic DFD, UML and BPMN notation collections use the same saved objects and relationships in 2D and 3D. Their specialist outlines and face information describe the drawing; turning the view does not execute a process or change the notation’s meaning. Use 2D to arrange dense compartments, participant bands or interaction messages precisely.
Clear space and recover a failed view
Close Diagram relief with × to hide its instructions. Help shows them again. Loading and rendering warnings remain visible. Navigation, Help, Overview and the object list share a scrollable stack, so opening one panel does not cover another panel’s summary.
If the 3D module could not download, restore your connection and choose Reload to retry 3D. The app finishes active edits and waits for local saves before reloading. A save failure keeps your changes open and shows the error.
If this browser cannot render 3D, use Objects and relationships and Return to 2D. Both remain available during loading, rendering failure and context loss. See Troubleshooting for recovery steps.
Export and large diagrams
PNG, PDF and SVG always use the 2D diagram, including labels, connections, status and visible pen strokes. While 3D is active, Saved 2D viewport uses your last saved 2D pan and zoom at the current canvas dimensions; without a usable saved viewport, it fits the 2D graph. SVG preserves vector text and geometry for scaling in another application. Native JSON and complete backups retain both placements and the 3D camera.
A walkthrough video can use the current 3D view, with camera movement around the cards. See Presentations .
The 3D view displays at most 8,000 objects and 16,000 relationships and announces when it is showing a partial view. Selection is prioritized. Detailed card appearances are limited to 120 logical cards near the current view; front and back reuse the same appearance. Moving the camera refreshes these detailed faces. Narrow filters or use a semantic overview when a diagram is dense.
CSV analysis still uses all matching source rows and its normal 600-object view limit. Individual raw rows are not turned into thousands of 3D cards.
Continue with Layouts and timelines to arrange the underlying diagram, Understand large diagrams to reduce complexity, or Sharing and export to choose an output.